INDOOR-OUTDOOR CARPET Installation Guidelines
OUTDOOR INSTALLATION GUIDELINES
Notice — For best results review the following guidelines prior to installation. Shaw will not be responsible for improper installation and failure to follow these guidelines may result in limiting warranty coverage.
These installation procedures are intended to assist in the installation of Commercial IndoorOutdoor products under most job conditions. Specific questions regarding installation not covered within must be referred to Technical Support at 800.471.7429. Any variance from these procedures will become the responsibility of the installer and not the manufacturer.
FLOOR PREPARATION
The installation surface must be visually dry and a minimum temperature of 50° F must be obtained by late morning / early afternoon in order to install outdoors.
Below are typical outdoor installation surfaces and recommendations for the proper preparation of these surfaces:
- Concrete — must be clean, level and dry. The substrate should be clean and free of dust, dirt, oil, grease, paint, curing agents, concrete sealers, loosely bonded toppings, loose particles, old adhesive residue, and any other substance or condition that may prevent or reduce adhesion. Depressions and cracks must be filled with a liquid latex additive cement based patching compound and all protrusions leveled.
- New Asphalt — must be allowed to cure under dry conditions for a minimum of 30 days and it is also advised to conduct a 24 hour adhesive bond test to assure proper adhesion.
- Rubber Roofing Membranes — we advise conducting a 24 hour adhesive bond test to assure proper adhesion.
- Pressure Treated Decking — we advise installing a marine grade plywood over the decking surface to prevent unevenness or gaps from telegraphing through the carpet. The marine grade plywood must be allowed to cure for a minimum of 30 days.
- Composite Decking — must be thoroughly clean and should it display any surface breakdown the surface should be sanded.
- Fiberglass — must be thoroughly clean prior to the application of adhesive
For additional information regarding these surfaces or others not featured please contact Technical Support at 800.471.7429.
ADHESIVE REQUIREMENTS / APPLICATION
On extremely porous or rough floors, more adhesive will be needed. Spread rates should never exceed 12 sq.yds per 2 glns/7300 and 21 sq.yds per 2 glns for outdoor carpet tile and 40 sq.yds per 4 glns/3800 Indoor Outdoor or an installation failure may occur. This indicates a worn or improperly notched trowel.
| 3800 Application and Coverage |
| Flooring Type |
Typical Trowel |
Coverage |
| Indoor / Outdoor |
1/8˝ x 1/8˝ x 1/8˝ U-Notch (3 x 3 x 3 mm) |
8-10 sy/U.S. gal (2.00 - 2.30 m2 per L) |
| Indoor / Outdoor Tile |
1/16˝ x 1/16˝ x 1/16˝ U or Square Notch |
3800 (12 - 15 sy/U.S. gal) (10.03 - 12.54 m2 per L) |
| 7300 Application and Coverage |
| Flooring Type |
Typical Trowel |
Coverage |
| Indoor / Outdoor |
1/8˝ x 1/8˝ x 1/8˝ U-Notch (3 x 3 x 3 mm) |
4-6 sy/U.S. gal (0.9 - 1.30 m2 per L) |
| Indoor / Outdoor Tile |
1/16˝ x 1/16˝ x 1/16˝ U or Square Notch |
14 - 21 sy/U.S. gal (3.06-4.53 m² per L). |
Trowel dimensions are depth/width/space. Coverages shown are for estimating purposes only. Actual jobsite coverages may vary according to substrate conditions, type of trowel used and setting practices.
7300 Flash time - 0 minutes Working time - 30 - 45 minutes Set time - 0 minutes
Flash time – Amount of time recommended for the adhesive to remain exposed to the air following application before the installation of material.
Working time – The maximum amount of time an adhesive can remain exposed to the air and still effectively bond the material.
Set time – The window of time when adjustments can still be made to the position of the material without compromising the bond of the adhesive.
Flash time, working time and set time vary based on temperature, humidity, substrate porosity, trowel size and jobsite conditions. For example, high heat and humidity will reduce working time and set time, low temperatures and humidity will extend working time and set time.
Shaw 7300 adhesive requires no flash time and products should be installed immediately.
3800 Exterior Application
Both soft set flash and working times will be affected by varying temperatures. An increase in temperatures above 70° will increase both flash and working time.
For every 10° increase in temperature, reduce these times by 5-10 minutes.
For every 10° decrease in temperature, increase these times by 5-10 minutes.
The complete installation must maintain dry conditions for 48 hours in order for the adhesive to cure properly.
SITE LAYOUT
Dry lay the entire area to be installed in the length / fiber direction. Implement roll sequencing prior to cutting any textured, graphic product. The date and time is backstamped (in military time) on the carpet to assist in sequencing. This will minimize the normal variations encountered when pattern matching and any bow or skew between the rolls.
CUTTING TECHNIQUES
Row Cut — Row Cut
INSTALLATION
- Apply Shaw 3800 / 7300 adhesive according to the adhesive pail and Requirements / Application chart.
- Apply Seam sealer
- Roll the product with a 75 lb. weighted roller across the width and length of the product surface.
- The completed installation must maintain dry conditions for 48 hours in order for the adhesive to cure properly.
BACKING SPECIFIC INSTALLATION
ClassicBac
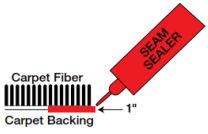
All ClassicBac product edges must be protected and sealed. Apply Shaw 8300, hot melt seam sealer or approved alternative a minimum of 1” to the classicbac backing. (See Approved Alternative Adhesive Chart.)
Marine
To avoid adhesive bleed-through to the surface of the product, allow the adhesive to become tacky to touch prior to the installation of this product.
EcoWorx
Allow Shaw 3800 adhesive to become tacky to touch prior to the installation of this product. Install tiles immediately when using Shaw 7300 adhesive. Do not allow exposure to foot traffic for a minimum of 24 hours to prevent tiles from shifting.
Seam Sealing
All Indoor-Outdoor products require the use of seam sealer. Shaw 8300, hot melt seam sealer or approved alternative seam sealer must be applied to the edges trimmed for seaming, and cover the thickness of both the primary and secondary backing without contaminating the face yarn. Seam edges must be sealed to prevent raveled edges, tuft loss, and delamination of the secondary backing in the seamed area.
INSTALLATION TIPS (when applying Shaw 7300)
Cut and/or trim the material salvage as needed. Fold back 1/2 of the run in the width to expose the substrate.
- Mix pails according to the label instructions, apply as many full pail quantities of adhesive to the substrate as possible for a period of 30 minutes or until sufficient adhesive has been completely applied to the exposed substrate.
- Install the material into wet adhesive in increments as applying the adhesive, and roll the material with a 75 lb. roller.
- Should bubbles or wrinkles develop in the material, roll the material until the adhesive secures the material or place a weighted object (sand bag) on the bubble or wrinkle.
- Fold back the material from the opposite side of the run, exposing the substrate and follow the same procedure as mentioned above.
- Repeat the mixing and application process in 30 minute increments until the entire first run is installed into adhesive.
- Proceed with the second run of material matching the seam if necessary. Continue with the mixing, application and installation process until the entire project is complete.
TRANSITIONS
Transition molding or strip that covers the carpet edge at least 1/2˝ is recommended for unprotected edges or where carpet meets other floor coverings.
POST INSTALLATION CARE
The completed installation must maintain dry conditions for 48 hours in order for the adhesive to cure properly. Do not allow exposure to foot trafic for a minimum of 24 hours.
INDOOR INSTALLATION GUIDELINES
Notice — For best results review the following guidelines prior to installation. Shaw will not be responsible for improper installation and failure to follow these guidelines may result in limiting warranty coverage.
These installation procedures are intended to assist in the installation of Commercial IndoorOutdoor products under most job conditions. Specific questions regarding installation not covered within must be referred to Technical Support at 800.471.7429. Any variance from these procedures will become the responsibility of the installer and not the manufacturer.
SITE TESTING AND CONDITIONING
The installation is not to begin until the HVAC system is operational and the following conditions are maintained. Maintain the temperature of the installation site, carpet, and adhesive between a minimum temperature of 65° F and a maximum temperature of 95° F for 24 hours before installation. The installation site’s ambient relative humidity should not exceed 65%. Maintain these conditions for 24 hours prior to, during and permanently afterwards.
MOISTURE REQUIREMENTS – Moisture testing must be performed. Shaw requires the use of the following test methods:
- Relative Humidity (RH) ASTM F-2170 results should be below 85%. or the
- Anhydrous Calcium Chloride ASTM F-1869 results should not exceed 5.0 lbs per 1000 square feet per 24 hours (2.27 kg/92.9 m2/24 hours).
Shaw recognizes the relative humidity (RH) test as the qualifying standard.
Do not begin the installation if an unacceptable moisture level is detected. If excessive moisture is present, the general contractor or building owner must be advised and a decision made if the installation is to begin. Shaw Industries will not be responsible for any moisture related installation failures if these guidelines are not strictly followed.
PH REQUIREMENTS – Test the concrete prior to beginning the installation. Check the concrete for surface pH at several locations. A reading below 5.0 or above 9.0 requires corrective measures. Specific information on the correct method of neutralizing low or high pH is available through Technical Support.
FLOOR PREPARATION
All substrates must be structurally sound, clean, level and dry. The substrate should be clean and free of dust, dirt, oil, grease, paint, curing agents, concrete sealers, loosely bonded toppings, loose particles, old adhesive residue, and any other substance or condition that may prevent or reduce adhesion. Depressions and cracks must be filled with a liquid latex additive cement based patching compound and all protrusions leveled.
- Concrete — must be clean, level and dry. The substrate should be clean and free of dust, dirt, oil, grease, paint, curing agents, concrete sealers, loosely bonded toppings, loose particles, and any other substance or condition that may prevent or reduce adhesion. Depressions and cracks must be filled with a liquid latex additive cement based patching compound and all protrusions leveled.
- Dusting / Powdering Concrete / Gypcrete — Concrete floors must be sealed with liquid latex such as Shaw 9050 if dusting or powdering exists.
- Pressure Treated Decking — we advise installing a marine grade plywood over the decking surface to prevent unevenness or gaps from telegraphing through the carpet. The marine grade plywood must be allowed to cure for a minimum of 30 days.
- Wood — must be Wood Association Approved and must be sealed with liquid latex such as Shaw 9050.
- Backer Board — must be primed with Shaw 9050 due to porosity and elevated pH of this product.
SITE LAYOUT
Dry lay the entire area to be carpeted in the length / fiber direction. Implement roll sequencing prior to cutting any textured, graphic product. The date and time is backstamped (in military time) on the carpet to assist in sequencing. This will minimize the normal variations encountered when pattern matching and any bow or skew between the rolls.
CUTTING TECHNIQUES
Row Cut - Row Cut
INSTALLATION DIRECT GLUE
- Apply Shaw 3800 / 7300 or approved alternatives.
- Shaw 3800 adhesive must be allowed to become tacky to touch prior to installing this product.
- Apply Shaw 8300 seam sealer or approved alternative. Apply a bead of seam sealer to the seam edge. Make sure the bead is thick enough to cover the base of the fiber and the product backing.
- Roll the product with a 75 lb. weighted roller across the width and length of the product surface.
BACKING SPECIFIC INSTALLATION
Classicbac Stretch-In
(Excludes Cut Pile Turf Products) Tackless strips can be nailed into wooden subfloors. Cementitious concrete surfaces may require that holes be drilled and anchors or screws be used to secure the strips to the floor. We discourage application over light weight concrete which would require special strips and fasteners. Non-flammable contact or epoxy adhesives can be used to glue down the strips. For larger areas, additional nails or screws must be used.
Place the strips on the floor with the pins pointed toward the walls. The space between the anchored strip and the wall is called the “gully”. A small portion of the carpet should be tucked into the gully and hooked to the pins. The proper gully space is approximately 2/3 of the thickness of the carpet and should not exceed 3/8”. Do not use tackless strips across door openings or staple carpeting into the strips. Areas over 30 feet in length or width are difficult to obtain sufficient stretch and can potentially wrinkle. We suggest alternate installation methods in these areas. Whenever stretch-in is necessary, architectural strips, which contain three rows of pins, should be used. Doubled up residential tackless strips are recommended in lieu of architectural strips.
To achieve best results when seaming, a premium tape with low melting point. An iron with heat shield should be selected. The seaming iron should be set at approximately 2½ and moved at a speed which will completely melt the hot melt adhesive. Construct the seam over a firm surface and run the iron in the direction of the pile, never against the pile. Follow iron with a non-metal seaming weight. Carpet and seaming tape must be cool to the touch prior to stretching the carpet to prevent the seams from pulling apart.
Caution – Do not allow seaming iron to stay in one position, this will result in melting the backing system. Use of a smooth wheel carpet tractor to blend the seam area may distort both the face fiber and backing and should only be performed when the seam area is cool.
Patterned carpets may require stretching to obtain proper pattern match.
Marine
To avoid adhesive bleed-through to the surface of the product, allow the adhesive to become tacky to touch prior to the installation of this product.
EcoWorx
Allow Shaw 3800 adhesive to become tacky to touch prior to the installation of this product. Do not allow exposure to foot traffic for a minimum of 24 hours to prevent tiles from shifting.
Seam Sealing
All Indoor-Outdoor products require the use of seam sealer. Shaw 8300, hot melt seam sealer or approved alternatives must be applied to the edges trimmed for seaming, and cover the thickness of both the primary and secondary backing without contaminating the face yarn. Seam edges must be sealed to prevent raveled edges, tuft loss, and delamination of the secondary backing in the seamed area.
TRANSITIONS
Transition molding or strip that covers the carpet edge at least ½” is recommended for unprotected edges or where carpet meets other floor coverings.
POST INSTALLATION CARE
The completed installation must maintain dry conditions for 48 hours in order for the adhesive to cure properly. Do not allow exposure to foot traffic for a minimum of 24 hours.