Mixing and Application Instructions
The MoistureTek moisture vapor barrier is a 2-part epoxy that reduces moisture vapor transmission to <3 lbs. / 1000 sq.ft. per 24 hours. You may apply MoistureTek 24 hours after a concrete pour. MoistureTek will withstand 100% RH, 25 lbs. CaCl and 14 pH, which eliminates the need for testing. MoistureTek will not withstand hydrostatic pressure. This vapor barrier chemically and mechanically seals the concrete, allowing for accelerated construction schedules and eliminating most moisture problems. You will apply one coat. Follow the instructions exactly. Any variance from these procedures will be the responsibility of the installer and not the manufacturer and will not be covered by this warranty. If you have any questions that are not covered in these instructions, contact Shaw Technical Support at 800.241.4014. The shelf life for this product is 2 years from the manufacturing date stamped on the lid.
STORAGE
Store MoistureTek indoors, protected from heat and cold, and at a temperature between 60°F and 90° F. Temperature is very important, as the MoistureTek will thicken when subjected to cold temperatures, hindering its penetrating capabilities. If MoistureTek is delivered during winter, then place it in a room at a temperature not lower than 50° for at least 48 hours.
MATERIALS YOU WILL NEED
Variable speed drill and 4” paddle for mixing
24” 1/8”x1/8”x1/8” V-notched squeegee or trowel
3/8” nap roller on 18” frame and 9” frame
(remove fuzz with tape)
2” tape to defuzz the nap roller and to mask off
perimeter, drains and other objects
Closed-cell backer rod for joints (optional)
Floor protector for new concrete (optional)
Protective gloves, eye protection, spiked cleats
Concrete shot blast, diamond scarifier or Surface Prep EXT (preferred)
Angle grinder with 1/8” tuck point blade (for end point keying)
Vacuum
Trim brush
Broom
Eco-friendly degreaser (if needed) fully removed
Mop and bucket
Drop cloth for your mixing station
ACCLIMATE THE AREA
- Concrete surface temperatures must be between 42°F and 90°F.
PREPARE THE CONCRETE
- Testing is not required. MoistureTek will not withstand hydrostatic pressure.
- Shot blast, diamond scarify or use Surface Prep EXT to a CSP of 2 to 3.
- For cracks or saw cuts deeper than 1", follow the preparation and application instructions for Shaw QuikFill. QuikFill is a 2part urethane treatment that prevents future damage from moisture penetrating to the surface of the slab that may damage or breakdown adhesives or unapproved patching compounds.
For Old Concrete
- Remove any adhesives, coatings or oil.
- Key edges and expansion joints with a 1/8” x 1/8” saw cut.
- If the concrete contains fiberglass, diamond grind rather than shot blast. If you shot blast before you realize there is fiberglass, lightly buff with 80 grit sandpaper to remove those fibers.
- Sweep, vacuum and mop the concrete for a clean, dust-free finish. Test with your hand to ensure there is no dust.
|
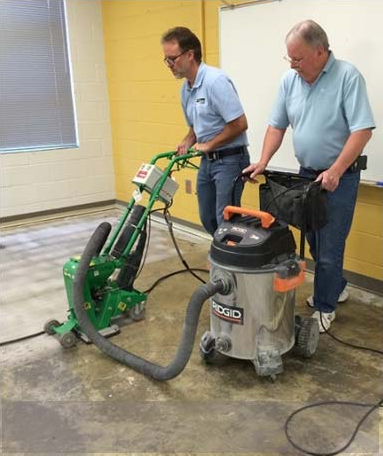 Bead blasting and vacuuming. Bead blasting and vacuuming.
|
For New Concrete
- Use Surface Prep EXT for profile and pH reduction.
- Concrete with a smooth steel-troweled finish, curing agents or densifiers or 24-36 hour concrete (without curing agents or densifiers) and has a light broom finish: Sweep the floor with a medium to stiff bristle broom to remove any laitance or loose cement.
- more than 36 hours and latency is forming on the surface: Lightly sand to remove the laitance. Sweep, vacuum and mop the concrete to a clean, dust-free finish. Test with your hand to be sure the floor is free of dust.
PREMIXING INSTRUCTIONS
- Check the containers for damage. If damaged, call 800.241.4014 for immediate replacement.
- Avoid skin contact by using gloves.
- For long-term exposures, wear eye protection and protective clothing.
- Spread rate 320-400 sf at 12-16 mils
MIX PART A AND PART B
- Open Part A. If Part A has been standing for a long time, especially in cold weather, it is possible that a certain amount of the Part A resin has gelled in the bottom. To reconstitute the resin, heat it at a temperature of about 120°F, stirring occasionally. The resin is reconstituted when no lumps are floating in the mixture. DO NOT TRY TO BREAK UP THE RESIN BY SIMPLY MIXING IT WITH A DRILL WITHOUT HEATING. The integrity of the resin is not affected by the heating and/or “gelling.” Heating of the resin can be done by immersing the bucket in hot water.
- Mix Part A for 20 to 30 seconds at LOW speed with a variable speed drill to incorporate any material that may have settled.
- Open Part B. The Part B hardener sometimes forms a “skin” on top. If so, use the same procedure as for the Part A. Skinning can also appear if the Part B is left open exposed to the air for any length of time. To help prevent “skinning”, always keep the container closed. Open the Part B container just prior to mixing. The Part B becomes darker with age. This does not affect its integrity.
- Pour all of Part B into Part A. It is imperative that you use correct proportions of Part A and Part B, which is pre-measured at 3 parts A to 1 part B. NEVER INCREASE OR DECREASE THE AMOUNT OF PART B TO PART A.
|
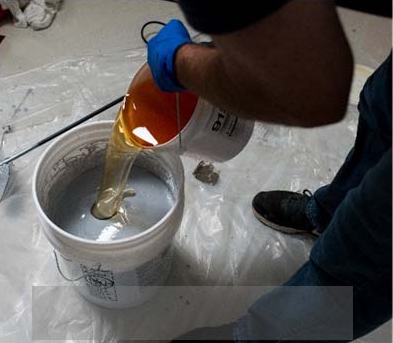 Pour Part B into Part A. Pour Part B into Part A.
|
- Mix thoroughly at a LOW speed for a minimum of 1 minute or until there is a solid color with no streaks. Scrape the sides and bottom of the bucket to ensure complete mixing. Mix to a uniform consistency and color. The variable speed drill must be fitted with a blade of at least 4 inches in diameter. A blade that is too small will not generate sufficient turbulence, creating a non-uniform mix, resulting in an incomplete cure with “wet” soft spots. Overmixing will shorten the pot life as well as introduce excess air into the mix.
|
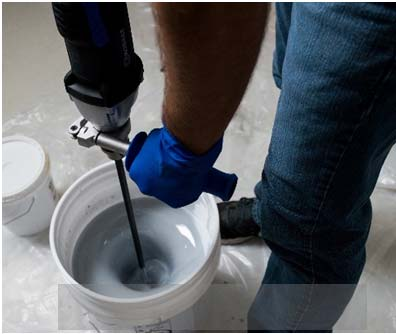 Mix Part A and Part B. Mix Part A and Part B.
|
- MoistureTek has a pot life of approximately 40 minutes, however, if it is left to stand in the bucket after mixing, the pot life will be reduced. Do not apply MoistureTek if it gets hot and thick or starts to pull on the roller. DO NOT ADD SOLVENT to MoistureTek.
APPLY EPOXY
- Pour entire mixture onto the floor in a ribbon fashion along the outside perimeter in a “U” shape. CAUTION: If the sides and bottom of the bucket were not scraped during the mixing process, do not scrape the sides and bottom of the bucket when pouring the mixture onto the floor. Also, do not leave the bucket upside down because this will cause any unmixed material to be spread onto the floor, creating soft spots.
- Wear spiked shoes so you can walk on the wet surface.
- Spread the mixture with a 24” 1/8”x1/8”x1/8” "V" notched trowel or a squeegee to a depth of 12 to 16 mils
- You can use MoistureTek to seal joints or cracks 1/8” or less. As you apply product, draw the product across and fill the cut. Allow to set up prior to applying finish coat. Finish by skimming the coating across the joint to create a smooth and level finish. For deeper cuts utilize a urethane crack filler, scrape flush prior to finish coat of MoistureTek. If crack is open longer than 36 hours sand for mechanical bond.
|
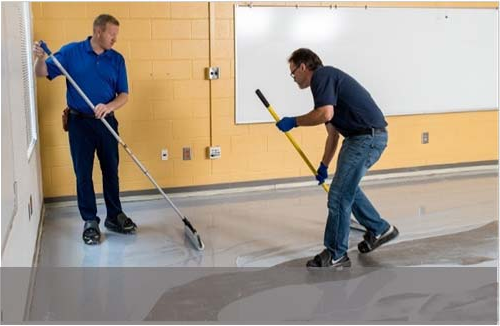
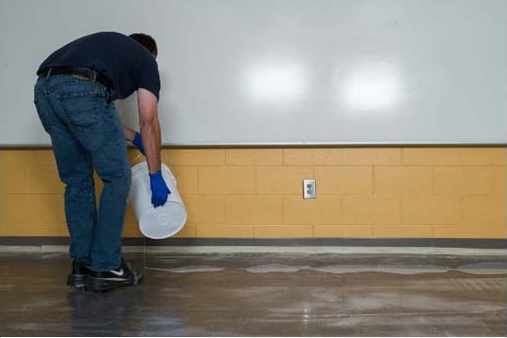 Pour in a ribbon pattern along outside edge. Pour in a ribbon pattern along outside edge.
 Spiked shoes. Spiked shoes.
|
- Use paint brush to cut around perimeter or objects.
- Pour out in a ribbon pattern and spread with a 24” 1/8” notched trowel or a squeegee to a depth of 12 to 16 mils.
- Wait 15 minutes.
- To ensure no bubbles, backroll the product in one pass at a 90° angle. Use a 3/8” nap paint roller mounted onto an 18-inch heavy-duty frame or a 9-inch frame. Wear spiked shoes so you can walk on the wet surface. Wait 20 more minutes to observe for small bubbles. If bubbles appear, back roll those areas again, changing the angle 90°. Backroll lightly. Multiple passes will cause bubbles (outgassing). If MoistureTek is setting up or tacky, stop backrolling. instead - If there is bubbling, backroll the product in one pass at a 90° angle. Use a 3/8" nap paint roller mounted onto an 18" heavy duty frame or a 9" frame.
- Let dry 8 hours at 70°. Add one hour for each 10° below 70°. Direct sunlight or a location above 70° will accelerate the curing.
|
 Backrolling on left; squeegee on right. Backrolling on left; squeegee on right.
|
FINISHING
- If you have a small amount left in the pail, move it outside as it will heat up before cooling.
- Clean up with warm soapy water while epoxy is still wet. If allowed to set, then use mechanical cleaning or the application of a paint stripper/solvent.
- MoistureTek will dry to a semi-gloss grey finish.
- If you plan to apply hard surface flooring, sand the surface lightly to ensure a strong bond with adhesive and floor covering.
|
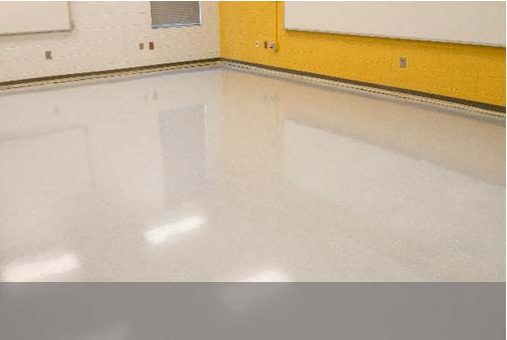 The finish will dry to a semi-gloss grey. The finish will dry to a semi-gloss grey.
|
- For best adhesion, allow the epoxy to cure for 8 - 36 hours.
- If MoistureTek has set for more than 36 hours, sand the floor lightly to remove the gloss and to scratch and dull the surface. This will ensure a strong bond with your flooring adhesive.
- If MoistureTek is applied in an active construction site, cover the floor with a protective layer such as Ram Board to avoid repairs. Minor dents and nicks can be easily repaired with an additional layer over the damaged area.