DuraWorx™ Commercial Cushion
Notice: For best results review the following guidelines prior to installation. Shaw will not be responsible for improper installation and failure to follow these guidelines may result in limiting warranty coverage.
These installation procedures are intended to assist in the installation of DuraWorx under most job conditions. See Shaw Industries and CRI 104 Broadloom Installation Guidelines for specific questions regarding installation not covered within or refer to Shaw Technical Support at 1.800.471.7429. Any variance from these procedures will become the responsibility of the installer and not the manufacturer.
DuraWorx by Shaw, a high performance polyurethane that provides enhanced support and sound reduction in high traffic environments including hospitality, corporate and healthcare. DuraWorx is designed for the installation of broadloom carpet in stretch-in applications and broadloom / EcoWorx tile in double glue installation applications.
1. Condition Your Site and Test
A proper installation depends on the proper site conditions. The following conditions must be maintained for 24 hours prior to, during and permanently after installation.
- HVAC System: Must be operational maintaining the following conditions.
- Temperature: The installation site, carpet, underlayment and adhesive must be between 65°F and 95°F (50°F and 95°F for EcoWorx tile). The adhesive will not function properly when applied over an extremely cold surface. Do not begin the installation if the subfloor temperature is below 50°F.
- Humidity: The installation site’s ambient humidity must not exceed 65%. (should not fall below 40% for EcoWorx tile).
- Moisture: Conduct relative humidity testing. Results must be below 85% (ASTM F-2170), or the Anhydrous Calcium Chloride test must not exceed 5.0 lbs. per 1000 SF per 24 hours (ASTM F-1869 test). Shaw recognizes RH as the qualifying standard.
- pH: Conduct pH testing on the floor in several locations. A reading below 5.0 or above 9.0 (ASTM F-710) requires corrective measures.
Do not begin the installation if an unacceptable moisture level is detected. Contact Shaw Technical Support for additional recommendations. If excessive moisture is present, the general contractor or building owner must be advised and a decision made if the installation is to begin. Shaw Industries will not be responsible for any moisture related installation failures if these guidelines are not strictly followed.
2. Prepare the Floor
The substrate must be structurally sound, clean, level and dry. The substrate must be free of dust, dirt, oil, grease, paint, curing agents, concrete sealers, loosely bonded toppings, loose particles and any other substance or condition that may prevent or reduce adhesion.
NOTE: Do not sand or scrape Vinyl Asbestos Tile (VAT) without proper attention to abatement procedures and precautions in accordance with all state and local codes. Shaw Industries makes no claims as to the acceptability of this procedure as a mitigation method in lieu of asbestos removal; and accepts no responsibility if any loose asbestos-containing floors are affected upon removal of a Shaw Industries products.
Fill depressions or cracks with a cementitious patching / leveling compound that meet or exceed Shaw Industries maximum moisture level and pH requirements. Use of gypsum-based patching and/or leveling compounds which contain Portland or high alumina cement and meet or exceed the compressive strength of 3,000 psi are acceptable. You may use wax-based (green) sweeping compounds if you sweep and remove them immediately.
Concrete floors must be sealed with a latex primer such as Shaw 9050 if dusting or powdering exists.
3. Select Your Adhesive
When adhering the DuraWorx cushion to the substrate, use a premium adhesive such as 1000 or 3800.
When adhering Broadloom carpet to DuraWorx, use a premium adhesive such as 1000 or 3800.
When adhering EcoWorx carpet tile to DuraWorx, use a premium adhesive such as 5000. Adhesive must become thoroughly cured, tacky to the touch with no transfer prior to the installation of Shaw’s EcoWorx tile. The amount of open time needed may vary due to temperature and humidity. Air movers placed on the floor moving air directly across the adhesive surface will aid in the tack time of the adhesive.
Adhesives containing solvents should not be used.
NOTE: Releasable adhesive is not recommended or warranted for the installation of Shaw’s DuraWorx / broadloom products.
4. Lay Out Your Site
- Measure, cut and place DuraWorx with the woven scrim side to the substrate.
- Cushion seams should be installed at right angles to broadloom carpet seams or staggered six inches from the carpet seams.
- Use the longest possible lengths. Small pieces may cause issues during positioning or stretching of the carpet.
- Allow a 1/8” space at the perimeter where the cushion meets the walls or tack strip, and seams.
5. Install DuraWorx
Stretch-In (Broadloom)
- After the cushion is in place, apply a premium cushion adhesive 15”-18” around the entire perimeter and seams.
- We recommend using duct tape on the seams to ensure that edge curl will not occur.
- When securing to wood substrates, staples should be placed no more than eight inches apart around the perimeter and staggering staples along the seams.
Double Glue (Broadloom / EcoWorx Tile)
- After the cushion is in place, fold it back and apply recommended adhesive with a 3/32” x 3/32” x 3/32” “V” notch trowel for Broadloom and a 1/16" x 1/16" x 1/16" "U" or Square notch for EcoWorx Tile. The adhesive must have adequate open time and must be tacky throughout the bed of adhesive. The amount of open time needed may vary due to temperature, ambient humidity and air movement.
- Place the cushion into the adhesive. To ensure 100% transfer of adhesive to the cushion roll the cushion with a 75-pound roller.
6. Install Broadloom
- Measure, cut and place the carpet on the cushion. Carpet edges should be row cut and fitted to assure a smooth, clean finished seam. Apply a latex seam sealer such as Shaw 4000 to each carpet edge at the base of the fiber along the backing edge.
- Fold the carpet back and apply the recommended adhesive with a 1/8 x 1/8 x 1/16 “U” notch trowel.
- Spread the adhesive up to the seaming tape edges, or you may apply the adhesive full spread. Allow the adhesive to become tacky to the touch before laying the carpet into the adhesive.
- A premium double glue, low profile, non-silicone paper hot melt tape is required for seaming the carpet edges.
Acceptable seam quality cannot be obtained without the use of a proper hot melt seaming tape designed for double glue installation
Note: With small room sizes and use of a premium non silicone paper tape, the seams may be hot melted prior to spreading adhesive.
- After the carpet is firmly in place trim the perimeter as necessary.
- After installation, it is recommended to roll the installation with a 75-pound roller.
Note: Carpet with attached cushion, hot melt, or unitary backings should not be used utilizing these installation methods.
7. Install EcoWorx Tile

LAY OUT YOUR SITE
- Start the carpet tile installation as near to the center of the room as possible and position it to use the largest perimeter cut tile size.
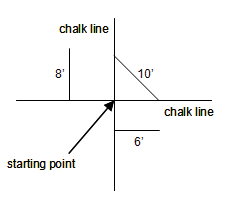
- Snap a chalk line parallel to one major wall bisecting the starting point. It may be necessary to offset the center chalk line to assure perimeter tiles will be at least half size.
- Snap a second chalk line from the starting point at 90° to the first line. Use a 3-4-5, 6-8-10, or larger triangle depending on the room size. Meters or feet may be used to lay out the triangle in these proportions.
Install Your Tile
Apply 5000 adhesive with a 3/8” foam paint roller (35-40 yds. per gln.). Apply the adhesive in quadrants or full spread. Allow the adhesive to become thoroughly cured, tacky to the touch with no transfer prior to installing carpet tiles into the adhesive.
Install each full carton and complete an entire pallet before starting another pallet to minimize product variation. Each tile has directional arrows on the back. These arrows allow for one- directional or multi-directional installation. Some styles may be large scale or linear in design and require quarter turning. If you are unsure about whether or not your product requires a quarter turned installation, please contact 1.877.502.7429. Numbers with the arrows are for manufacturing purposes and are not related to installation.

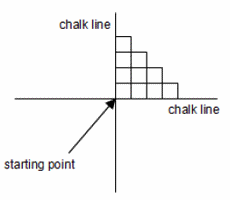
- Begin installation at the intersection of two chalk lines. Continue until you complete on quadrant. Proceed to an adjoining quadrant until all four quadrants are completed. Larger areas may require chalk lines bisecting the original four quadrants.
- Install tiles using the pyramid technique. This gives you multiple alignment checks. If the edges do not align and the misalignment increases with progression of the installation, find and correct the source of the problem.
- Carpet tiles come in various sizes and shapes. All Shaw tiles have directional arrows on the back of the tile. This facilitates the installation method which is based on the requirements of the product, or the preference of the customer.
- Slide tiles into position to prevent yarn from being trapped between the tiles. Trapped yarn will adversely affect the appearance of the installation and will cause alignment problems.
- Tiles must fit snugly, but not be compressed. Press the entire surface of the tile to ensure adhesion. Check for fit by measuring the length of ten full tiles after installation. The measurement must not be less than, or exceed by more than ¼ inch, the length of the tiles being multiplied by ten. For example; if 24” x 24” tiles are being installed, the measurement should be between 240 and 240 ¼ inches.
- Roll the entire installation with a 75 lb. or greater roller to assure the proper adhesion to the substrate.
Flatwire Cable Systems
Flatwire cables should be installed on top of the adhesive and centered underneath the carpet tile for better seam quality.
Cut Your Tiles
- Measure and cut tiles from the back using a straight edge. Be sure the arrows are pointing in the correct direction.
- Or let tiles cove up the wall and cut with a carpet knife, wall trimmer or similar tool. Do not compress.
8. Post Installation Care and Protection
- Place plywood over the carpet when heavy objects are moved within 24 hours after installation.
- Use protective chair mats under chairs with casters. This will prevent excessive wear to the face of the carpet.
- Place a non-staining building material paper over the carpet to protect it when additional construction activity is to take place. Do not use plastic sheeting as it will trap moisture.