Hardwood Laminate Installation on Step Downs or Staircases
Stair Tread and Riser Directions
Stair tread and riser installation: Planks and moldings must be full spread glued to the existing stair tread and riser, using ECOMADE wood flooring adhesive. Stair Nose moldings must be installed using adhesive and finish nails or trim screws. Check with local building codes before modifying the original profile of existing steps. Always follow your local code requirements concerning step tread and riser dimensions.
*Shaw requires fully adhering installations on steps for safety and structural stability reasons.
Installation Tips:
- Moldings should be pre-drilled to avoid splitting whenever they are to be secured with nails or screw type fasteners, unless a pneumatic trim nailer is used. Use a piece of clear 2” packaging tape to cover the area of plank that is to be pre-drilled. This will prevent unwanted marks or scratches from drill bits.
- The tool of choice for cutting plank is a 10”or 12” motorized miter saw with pre-set adjustments for the basic miter cuts at 22.5o, 45o, and 90o. A carbide tipped blade makes the best cuts.
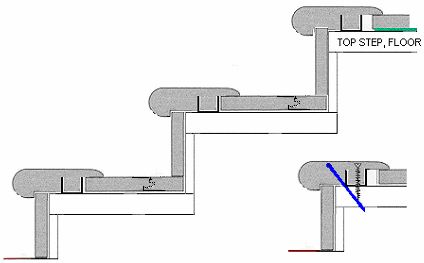
- Start at the highest step, installing the tread piece first, then the riser piece. Install the stair nose molding last. Cut the tongue from the riser piece so that the factory edge meets the tread. The result will be a tight, clean seam where the tread and riser meet.
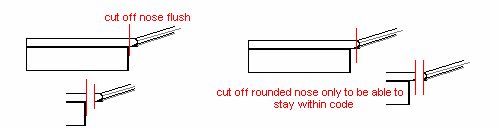
Modify rounded stair tread ends by cutting them square. Always follow building code regulations to maintain adequate stair tread and riser dimensions.
- Starting at the highest step, measure and cut the plank tread, riser, and stair nose pieces. Dry fit the plank pieces to insure a proper fit before attaching them to the original step.
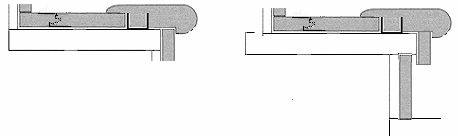
- Install the plank tread piece to the existing tread with ECOMADE adhesive applied using a 3/16” V-notched trowel.
- Attach the plank riser piece to fit flush with the existing stair tread using ECOMADE adhesive.
- Attach the Stair Nose molding using a molding track, ECOMADE adhesive, and finish nails/screws, to finish the step. Fill nail/screw holes with color fill.
- Allow steps to set 12 hours before allowing foot traffic so that adhesive can cure.
- Contact Shaw Information @ 1.800.257.7429 for more help.
Main flooring surface maintain expansion at the step down transition.