Residential Laminate Angle and Tap
Installation
IMPORTANT – Make sure subfloor is clean, dry and flat (maximum 3/16-in. deflection over 10 feet.) Always use safety glasses and a mask.
Suitable subfloors for Laminate Flooring are:
-
Existing floor surfaces including hardwood floors, linoleum, resilient vinyl and PVC (plastic floor surfaces must be permanently attached to the subfloor).
-
Cement floors on all grades/elevations (maximum residual moisture 2.0 CM%). With a calcium chloride test, the maximum acceptable reading is 5.0 lbs/24 hours/1,000 sq. ft.
-
Anhydrite and Anhydrite tiles, Magnesium Cement (maximum residual moisture 0.3 CM%)
-
Wood subfloor moisture 14.5% maximum
-
Concrete relative humidity 70% maximum
Attention! Without a documented measurement of residual moisture content, a claim against the manufacturer for damages cannot be considered. Concrete sub-floors must always be covered with a 6 mil vapor barrier even if linoleum, PVC or resilient vinyl is firmly attached to the concrete.
WARNING Drilling, sawing, sanding or machining wood products can expose you to wood dust, a substance known to the State of California to cause cancer. Avoid inhaling wood dust or use a dust mask or other safeguards for personal protection. For more information go to www.P65Warnings.ca.gov/wood.
IMPORTANT HEALTH NOTICE FOR MINNESOTA RESIDENTS ONLY: THESE BUILDING MATERIALS EMIT FORMALDEHYDE. EYE, NOSE, AND THROAT IRRITATION, HEADACHE, NAUSEA AND A VARIETY OF ASTHMA-LIKE SYMPTOMS, INCLUDING SHORTNESS OF BREATH, HAVE BEEN REPORTED AS A RESULT OF FORMALDEHYDE EXPOSURE. ELDERLY PERSONS AND YOUNG CHILDREN, AS WELL AS ANYONE WITH A HISTORY OF ASTHMA, ALLERGIES, OR LUNG PROBLEMS, MAY BE AT GREATER RISK. RESEARCH IS CONTINUING ON THE POSSIBLE LONG-TERM EFFECTS OF EXPOSURE TO FORMALDEHYDE. REDUCED VENTILATION MAY ALLOW FORMALDEHYDE AND OTHER CONTAMINANTS TO ACCUMULATE IN THE INDOOR AIR. HIGH INDOOR TEMPERATURES AND HUMIDITY RAISE FORMALDEHYDE LEVELS. WHEN A HOME IS TO BE LOCATED IN AREAS SUBJECT TO EXTREME SUMMER TEMPERATURES, AN AIR- CONDITIONING SYSTEM CAN BE USED TO CONTROL INDOOR TEMPERATURE LEVELS. OTHER MEANS OF CONTROLLED MECHANICAL VENTILATION CAN BE USED TO REDUCE LEVELS OF FORMALDEHYDE AND OTHER INDOOR AIR CONTAMINANTS. IF YOU HAVE ANY QUESTIONS REGARDING THE HEALTH EFFECTS OF FORMALDEHYDE, CONSULT YOUR DOCTOR OR LOCAL HEALTH DEPARTMENT.
WARNING! DO NOT MECHANICALLY CHIP OR PULVERIZE EXISTING RESILIENT FLOORING, BACKING, LINING FELT, ASPHALTIC “CUT-BACK” ADHESIVES OR OTHER ADHESIVES. PREVIOUSLY INSTALLED RESILIENT FLOORING MAY CONTAIN EITHER ASBESTOS FIBERS OR CRYSTALLINE SILICA. THE PRODUCTS IN THIS BOX DO NOT CONTAIN ASBESTOS.
AVOID CREATING DUST. INHALATION OF SUCH DUST IS A CANCER AND RESPIRATORY TRACT HAZARD. SMOKING BY INDIVIDUALS EXPOSED TO ASBESTOS FIBERS GREATLY INCREASES THE RISK OF SERIOUS BODILY HARM. UNLESS POSITIVELY CERTAIN THAT THE PRODUCT IS A NON-ASBESTOS CONTAINING MATERIAL, YOU MUST PRESUME IT CONTAINS ASBESTOS. REGULATIONS MAY REQUIRE THAT THE MATERIAL BE TESTED TO DETERMINE ASBESTOS CONTENT AND MAY GOVERN THE REMOVAL AND DISPOSAL OF MATERIAL. SEE CURRENT EDITION OF THE RESILIENT FLOOR COVERING INSTITUTE (RFCI) PUBLICATION “RECOMMENDED WORK PRACTICES FOR REMOVAL OF RESILIENT FLOOR COVERINGS” FOR DETAILED INFORMATION AND INSTRUCTIONS ON REMOVING ALL RESILIENT COVERING STRUCTURES.
For Successful Installation, remember:
-
Identify the tongue side and the groove side.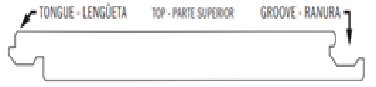
-
The tongue side (the smaller extension without a ridge on it) goes against the beginning wall.
Angle-Tap Installation
|
(1)
|
(2)
|
(3)
|
(4)
|
|
Install vapor barrier if subfloor is cement
(6 mil polyethylene film).
|
Always use an underlayment padding above the vapor barrier and below the laminate flooring planks. If pad is pre- attached, no additional underlayment should be used.
|
Install parallel to the main light source.
|
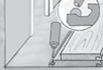
If possible, start to lay panels under the door jamb and finish installing planks on a wall without a door jamb. Undercut door jamb. See Working with Limited Clearance section.
|
|
(5)
|
(6)
|
(7)
|
(8)
|
|
Remove the tongue on the panels that abut the walls to allow room for spacers and prevent problems from spills.
|
Lay panels close together on floor.
|
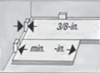
Observe 3/8-inch clearances and 6-8 inch minimum for the smallest usable piece.
|
Lock in panel lengthwise. Allow a 8-12 inch minimum end-joint stagger row to row. Install first and second row at the same time. This will help ensure end- joints are perfectly square.
|
|
(9)
|
(10)
|
(11)
|
(12)
|
|
Use a 4-inch - 6-inch piece to hold the tongue and the groove on the same plane, limit end-joint damage and ensure planks engage square. Tap end- joints with multiple light taps, striking the tapping block evenly until end-joints close. NOTE: Tapping too hard or striking the tapping block unevenly can result in installation-related damage or peaking.
|
To measure and cut last piece in a row, rotate offcut section 180º, mark accordingly, cut, rotate back 180º and slot into space.
|
Fit the last panel in the row using a pull bar.
|
Always allow for 5/16-inch - 3/8-inch expansion around fixed objects.
|
|
(13)
|
(14)
|
(15)
|
REMOVAL:
|
|
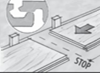
An expansion gap T-strip is recommended
when the length or width of the connected planks measures 45 feet (13.7m).
Transition strips must be placed in all doorways measuring 36 inches (.92m) or less.
|
Cut the last row to size. (2-1/2-inch min. width). Remove the plastic tongue before rip cutting planks for the first and last row. Break the tongue to size and reinsert.
|
Ensure floor is able to “float”.
|
Disengage row, then carefully lift plank up from right to left.
|
Working With Limited Clearance
|
(1)
|
(2)
|
(3)
|
|
|
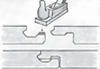
Some long edge joints cannot be installed using a 20° angle. Remove top part of the groove profile.
|
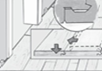
Use good quality wood glue to make the connection.
|
Slide panel into space horizontally and lot into profile. Use these modified planks under doorframes, radiators, cabinet fronts, etc. Use the pull bar to slide the planks where needed.
|
|